Nous avons vu dans un précédent billet comment optimiser vos photos avec XnView ou avec Gimp pour qu’elles s’affichent rapidement dans votre site de e-commerce.
Nous allons voir maintenant comment les intégrer dans une fiche produit de Prestashop.
Intégration des images dans les fiches produits de Prestashop
Il n’est pas nécessaire de renommer vos photos. Prestashop utilisera des noms à lui, composés de l’id du produit, d’un n° d’incrément et du nom d’un des 5 types d’images nécessaire à l’affichage du produit dans Prestashop (ce qui peut être un petit inconvénient pour le référencement naturel dans Google images, mais qui est bien pratique car il gère tous seul les différentes tailles et différents noms des photos).
5 types et tailles d’images sont utilisé en standard par Prestashop pour les photos d’une fiche produit :
- Small : 45 x 45 pixels
- Medium : 80 x 80 pixels (utilisé pour la sélection de la photo dans la fiche produit, dans la zone nouveau produit, déjà vus ou réductions)
- Large : 300 x 300 pixels (utilisé pour l’affichage en grand du produit)
- Thickbox : 600 x 600 pixels (utilisé pour l’affichage détaillé du produit)
- Home : 129 x 129 pixels (utilisé pour afficher le détail d’une catégorie, pour les produits phare en 1ère page de la boutique, ou pour la recherche d’un produit)
L’image avec la taille d’origine de la photo, qu’il recopie comme photo de référence, mais qui n’est pas utilisé par Prestashop.
Lorsque vous avez saisie les informations concernant la fiche produit, cliquez sur l’onglet Images. Remplissez les champs en fonction de votre photo :
- Fichier : Cliquez sur Parcourir pour choisir la photo que vous avez déjà redimensionné
- Légende : Saisissez la légende associé à cette photo, celle-ci est importante pour le référencement dans Google images, pensez à utiliser 1 ou 2 mots clés.
- Couverture : à cocher pour indiquer que cette photo sera celle qui sera affiché en premier pour cet objet, dans votre boutique en ligne.
- Méthode de redim. des miniatures : je vous conseille de laisser automatique, ainsi Prestashop définira tout seul les 5 différentes dimensions des photos.
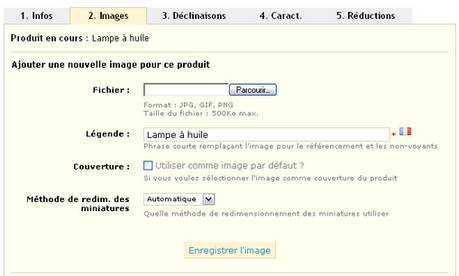
Il ne vous reste plus qu’à cliquer sur le bouton Enregistrer l’image. Prestashop va automatiquement créer les 6 types d’images nécessaires à son fonctionnement (que vous pouvez retrouver dans …prestashopimgp).
Vous devez répéter les étapes précédentes pour toutes les photos que vous souhaitez insérer pour ce même produit.
Il est d’ailleurs fortement recommandé d’utiliser plusieurs photos pour un même produit (prises sous différents angles, avec éventuellement des agrandissements, des détails, en situation…). En effet votre client ne peut pas voir réellement votre produit. Donc plus il aura de photos du produit, moins il aura d’interrogations, il sera alors plus enclin à vous acheter votre produit.
Intégration des images dans les catégories des produits de Prestashop
Comme pour une photo d’une fiche produit, Il n’est pas nécessaire de renommer vos photos, Prestashop utilisera ses noms propres.
4 types et tailles d’images sont utilisé en standard par Prestashop pour les catégories d’une fiche produit :
- Small : 45 x 45 pixels
- Medium : 80 x 80 pixels
- Large : 300 x 300 pixels
- Category : 500 x 150 pixels
L’image avec la taille d’origine de la photo, qu’il recopie comme photo de référence, mais qui n’est pas utilisé par Prestashop.
Saisissez le nom et la description de la catégorie et cliquez sur le bouton Parcourir du champ Image, complétez les autres champs.

Paramétrage des tailles des images utilisées par Prestashop
Les différentes tailles des images indiquées ci-dessus, peuvent être modifiées dans l’onglet Préférences, choix images :
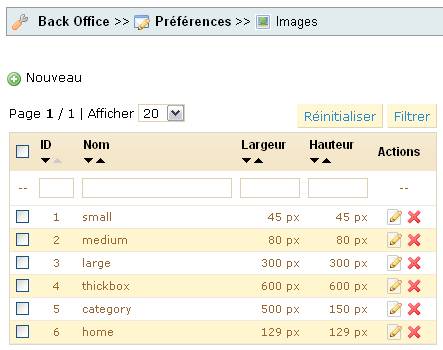
Si vous modifier une taille pour un ou plusieurs format, pensez bien à cliquer ensuite sur le bouton : Régénérer des miniatures en bas de page.
Conclusion
Voilà , ainsi s’achève notre série d’article sur l’optimisation des photos dans Prestashop, nous vous proposerons bientôt un dossier pdf à télécharger regroupant les différentes étapes.
L’intégration des photos dans Prestashop est très simple, un effet lightbox (mettant en valeur les photos, en les affichant sur fond noir) est intégré par défaut avec la possibilité de passer en revu les différentes photos insérés pour un même produit.
Il ne manque plus qu’un système permettant de grossir certains détails d’une photo d’un produit et la gestion des photos, dans Prestashop sera complète pour une petite boutique en ligne.

bonjour,superbe tutos bravo.
mais moi j’ai un soucis malgres que je suive le tuto a la lettre les images ne sont jamais afficher je comprend pas !j’ai toujour le message pas d’image dispo.si vous avez la solution je suis preneur.
merci .
Vérifiez que dans le dossier prestashop/img/p, vous ayez bien un grand nombre d’images. Peut être avez vous un problème d’autorisation de fichiers.
merci effectivement il y avais un probleme de permission !! j’ai passer les chmod du fichier img en 755 et ca marche
Salut!
En revanche, savez-vous s’il est possible d’insérer une photo dans le champ ‘description’ d’une fiche nouveau produit?
Ça m’étonne qu’on ne puisse pas car on peut insérer un fichier Flach ou Shockwave…
Bonjour Jerome,
Bien sûr vous pouvez le faire.
Cliquez sur le bouton html de l’éditeur de texte, et entrez y la balise img.
Salut,
Lorsqu’on a supprimé les fonctions small, medium, large etc. comment peut-on les recréer en gardant les même numéro ID. En effet, quand on veux les recréer manuellement en cliquant sur « nouveau » il est impossible de recréer « small » avec le numéro « 1 », à la place apparait le numéro « 9 » et ainsi de suite ce qui fait qu’il devient impossible de faire réapparaitre les images.
L’id possède une propriété d’auto incrémentation. Ce qui veut dire, que vous ne le choisissez pas.
Néanmoins, vous pouvez le réinitialiser, en vous rendant dans l’administration de votre base de donnée (ex : phpMyAdmin). Puis dans la table concernée (ici : image), et enfin dans l’onglet opération.
Vous trouverez alors un champ AUTO_INCREMENT, que vous mettrez à 1.
Merci mille fois pour votre réponse rapide.
Rebonjour,
Voilà, j’ai essayé de changer le nombre de valeur de l’AUTO_INCREMENT mais ça ne marche pas. Dans la case il est écrit 56, j’efface ce chiffre pour mettre 1 puis je clique sur le bouton « exécuter », mais c’est le chiffre 56 qui se remet.
Cela signifie que la table contient des données donc vous ne pouvez pas changer ce numéro.
D’ailleurs c’est la table image_type qu’il faut modifier et non la table image.
Sinon c’est étrange que vous ayez besoin de faire cela pour voir vos photos… Avez-vous essayer de régénérer les miniatures ?
Tout baigne. C’est en effet « image_type » qu’il fallait modifier. J’ai réinscrit les données manuellement et tout refonctionne parfaitement. Merci encore.
Bonjour,
Merci pour cet article. J’aurai une petit question concernant les images que l’on insère pour les catégories de produits : j’aurai aimé mettre un lien sur ces images, mais il ne semble pas que se soit possible… Pouvez vous me dire s’il y a une possibilité pour mettre un lien sur ces images ?
Merci d’avance.
De base, ce n’est pas possible non. Il faudrait utiliser un module je pense.
Bonjour,
Savez vous quel est l’appareil REFLEX neuf le moins cher du moment et le plus simple d’utilisation pour faire des photos pour site Ecommerce ?
Et si je choisissais un BRIDGE vu qu’ils sont vendus moitié prix par rapport aux REFLEX, vous pensez que cela suffira ?
Je n’aime pas la photo, je n’ai, et n’aurais jamais aucun intérêt à en faire pour les loisirs, c’est juste pour le travail.
MERCI POUR VOTRE AIDE !
Bonjour,
Merci pour ce tuto. Quand la photo n’est pas au bon format, elle est redimensionnée automatiquement pas Presta, mais il rajoute d’office un fond blanc sur les cotés si le format d’origine n’est pas carré. Où peut on changer la couleur ?
Par avance merci
@Loran, ce n’est pas un paramètre du BO, il faudra modifier le code obligatoirement.
@videogratuites : Je ne peux pas vraiment vous conseiller sur un modèle, désolé !
Bonjour,
ET comment faire, si l’on ne veut pas afficher d’images et faire en sorte que le message par défaut « aucune image disponible » se s’affiche pas.
Merci
Bonjour,
merci beaucoup pour ces conseils précieux.
Je rencontre un problème avec la couleur de mes photos.
A la différence de mes photos d’origine, sur prestashop, les couleurs sont beaucoup trop vives, donc le rendu n’est pas très beau.
Comment faire?
Merci à vous
Vous dites : « L’intégration des photos dans Prestashop est très simple, un effet lightbox (mettant en valeur les photos, en les affichant sur fond noir) est intégré par défaut avec la possibilité de passer en revu les différentes photos insérés pour un même produit. »
Je n’ai pas trouvé comment mettre en oeuvre l’effet lightbox. Pouvez-vous m’éclairer ?
Merci d’avance de votre aide.
@feizel normalement le template de Prestashop l’intégre de base.
Bonjour,
Je rencontre un problème : Mes photos sont floue.
Toutes les photos du thème prestashop d’origine sont floue. Je n’ai pas touché aux réglages des photos car je suis au début de l’expérience prestashop.
J’ai acheté un thème plus complet mais pareil : les photos d’origine sont floues. Evidement quand je met les mienne à la place, c’est floue aussi.
Quelqu’un pourrait-il me sorti de cette impasse ??
Merci
Cordialement
Merci, merci et re- merci… 1 semaine que j’épluche les codes dans tous les sens pour me rendre compte que j’avais par erreur, supprimé les entrées « small », « medium », « large »… sauf home et category. Résultats : les sous-dossiers du répertoire img restaient vides… La seule solution restant à créer les vignettes à « la mano » et les uploader à l’ancienne via le ftp.
Mon erreur est grossière mais elle m’a couté énormément de temps… donc si ma mésaventure peut servir à quelqu’un.. ;-))
Bonjour,
Je viens de transférer Prestashop 1.5.2.0 d’une version local sur un hébergement ovh.
Tout fonctionne sauf le logo est flou et de nombreux icônes sont flous ou n’apparaissent pas.
Le passage au back office donne aussi une image floue avec connexion. Dans préférence/themes, le theme l’image du theme par défaut n’apparaît pas.
Savez-vous ce qu’il faut faire pour remédier à ces problèmes.
Merci.
Retour de ping : Gestion des photos | binaire
bonjour
Savez-vous ce qu’il faut faire pour ajouter un article sur le back office puis le transférer sur le site en ligne. j’ai beau chercher sur le net j’ai pas trouver.
je suis sous prestasho 1.5
Si Quelqu’un pourrait me sortir de ça.
Merci
Cordialement
Bonjour
Par contre comment faites vous pour que les photos des fiches produits soit en slide moi quand je clique sur les miennes sa m’ouvre une autre fenêtre
je vous laisse testé http://www.cadoriginaux.com/index.php?id_product=5&controller=product#/quantites_lots-1
dans l’attente de vous lire une débutante
cordialement
BONNE ANNEE 2014
Savez vous comment placer une petite image à coté d’une catégorie? quel est la taille dans photoshop?
merci
Bonjour,
Peut être pouvez vous m’aider… Je souhaite retirer l’affichage de l’image default lorsque je ne mets pas d’image produit. De plus j’ai mon affichage description qui ne se fait pas et qui en plus me decale mes icones cf page boudin vs page darne ? Avez vous une idée ??
Merci, bien cordialement,
Vanessa