You can order Shopializable extension here.
The tutorial written in french is here.
To get notified about updates of the module, follow the blog, or this Facebook page.
Table of contents
- Installation on Prestashop
- Installation on Facebook
- Modify the Facebook tab name
- Display the shop first on Facebook
- Update data on Facebook
- Translate or modify translation
- Use another template on Facebook
- Troubleshooting
Installing the module on PrestaShop
Once the module is downloaded (if not yet the case, visit our shop), install it on PrestaShop.
To do this, copy the module into the folder « modules » of your installation of PrestaShop.
Then go, in the Administrator Modules tab. Look for the name « Shopializable » in the list of modules :
-For PrestaShop version below 1.4, the module is in the Tools part.
-For PrestaShop version 1.4 and above, the module is in the Advertising & Marketing part

Click Install, then click configure.

You should see the configuration form. Fill the various fields. None of these fields is mandatory.
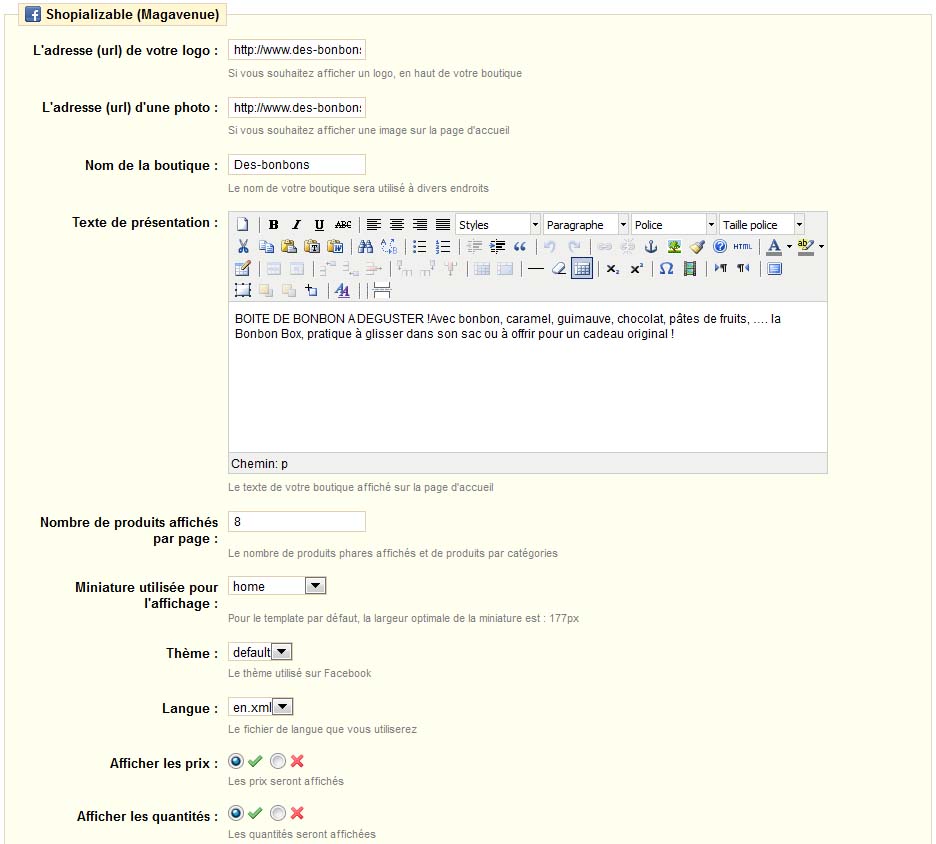
A box lets you choose the theme to use. We recommend that you use « default ».

You can choose the english language (or another one) in front of the field « language ».
Finally, simply click « Update. » It is essential to click at least once on this button for the proper functioning of the module (even if you made no change).
The installation is finished on the side of PrestaShop.
Installation of Shopializable on Facebook
Please follow the instructions once you are logged on Facebook and you’ve created your Facebook page. The application must settle on a Facebook page (page Fan page Business, more …) and not an account / Facebook profile. If you do not have a page, you can create one at this address : https://www.facebook.com/pages/create.php
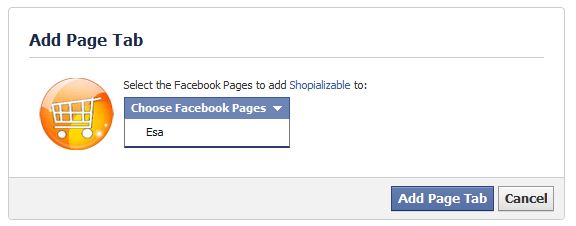
Sign into your Facebook account, then click on the following link : https://www.facebook.com/add.php?api_key=290911957094&&pages=1
A Facebook popup should appear with a drop down menu containing your Facebook page. Choose the page where you want to install the module, then click on « Add to my page ».
(To add an application on a Facebook page, you need to have a Facebook account with administrators rights on the Facebook page. If you don’t see the link « Add to my page », then you need to create Facebook profile and to add it as administrator of your Facebook page. Otherwise, you can contact us, we will do it for you).
Once installed, you should see a blank page. Go to your Facebook page (by searching the name of your page).
Click on the link « edit my page » in the upper right.
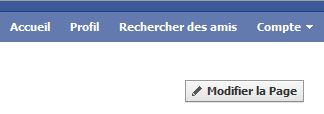
You are now on the configuration page of your Facebook page. In the left menu, click « Applications. »
In the application list, locate « Shopializable » and click « Go to Application »

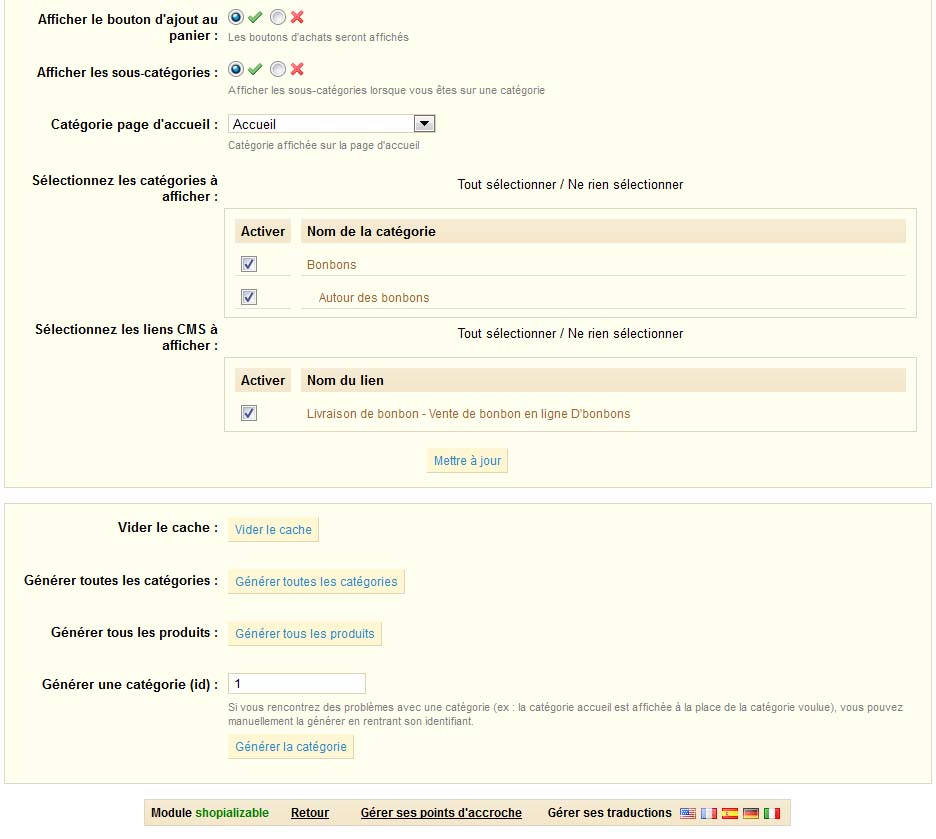
You are on the setup. In the first field, enter the exact address to our extension. Ie the exact address of the root of your store (not an introductory page or another parallel site) followed by “/modules/shopializable/”.
Example : https://www.nomdedomaine.com/modules/shopializable/
If your shop is in a subfolder, the example would be : https://www.nomdedomaine.com/dossier/modules/shopializable/
To help, you can copy the address contained in the configuration of the module Prestashop just before the button « Update »

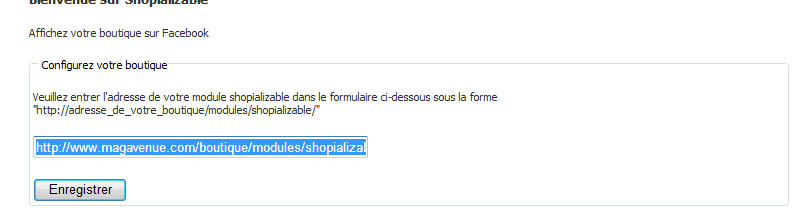
Do not forget the « https:// » and the last « / » at the end of the address.
Once you have clicked « Save », turn on your Facebook page.
Once you’re on, you should have a tab « Shop » on the left.
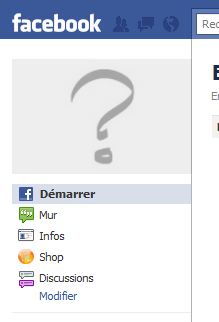
If clicked, the application should load.
The application should be installed.
Change the name of the Facebook tab
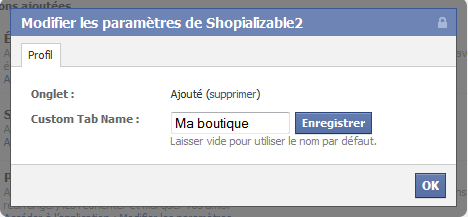
If you want to change the tab name (default « shop »), you can do so by going to your Facebook page.
In the configuration part (click on « edit page » button at top right), click « Applications » on the left. Below Shopializable, click « Change Settings ». Fill the « Custom Tab Name » field to change the name.
View the shop tab by default
This option is available only for old format Facebook page. It’s not yet available for Timeline page format.
If you want, you can first display your store on your Facebook page instead of your wall. This change will only be visible to fans of the page and not the administrator (do not be surprised if you do not see a change with your account).
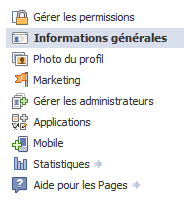
Go to your page. In the configuration part (click on « edit page » button at top right), click on « Manage Permissions ».
On the right side, you will have a field « tab displayed by default ». Select « Shop » (or whatever name you gave the tab).

Update data on Facebook
Shopializable uses a cache for a faster loading on Facebook. And to avoiding many queries on your shop, if your Facebook page is often viewed.
You can empty the cache manually by clicking the « Empty Cache » in the configuration of the module.
You can update the cache automatically by adding a cron job to the cron.php file contained in the module (https://www.votreboutique.com/modules/shopializable/cron.php).
Translate or modify a translation
Shopializable uses XML files for translation. They are contained in the lang folder (/modules/Shopializable/lang/).
If you want to change a translation, open the desired file (eg for French: fr.xml).
Each node « lang » is a translation.
The « find » child contains the element to be replaced in the template.
The « replace » child contains the translation.
If you want to create a new translation, copy the file en.xml into a new one (iso.xml). Open and edit each node as above.
You can add as many nodes as you want.
If you modify or create a translation file, remember to update the configuration Shopializable.
Use another template with Shopializable
We can create you a custom template. Contact-us for an estimate. Describe what you would like.
Shopializable a system to create your own template. You just have to edit the files in /modules/shopializable/template/.
For your convenience, we recommend you copy the template « default » in a new folder.
Inside this folder you have some .tpl files, containing the html code of the template. You have a style.css file containing the stylesheet.
If you change the template, remember to update the configuration Shopializable.
Troubleshooting
No support will be made by comment (comments will be deleted)! Please contact-us instead ! We will reply as soon as possible. Add to your request, the URL of your Facebook page and the url of your store.
If the Facebook shop is empty or nothing is displayed. The address entered during setup may not be good. A simple test is to enter this address in your browser (https://votreboutique.com/modules/shopializable/). You should then be redirected to the home page of your store.
Check that the « xml » folder have the correct permissions to write files in it. You can try CHMOD(755) or CHMOD(777). Then you must update the configuration from the module PrestaShop.
A category is poorly built, or you receive the message « this page could not be loaded correctly?
-You can manually generate a category (or to update its content if it does not display correctly) by entering the identifier of the category below Shopializable module.
-You can generate all the categories by clicking on the button « generate all categories » in the configuration of the module PrestaShop.
-You can generate all products by clicking on the button « generate all products » in the configuration of the module PrestaShop.
If you have a 404 error when adding to cart, add at the end of your file. Htaccess the following lines:
RewriteRule l.php /order.php [L,E]
RewriteRule profile.php /order.php [L,E]
Privacy policy
The application doesn’t use any of your Facebook data except the Facebook page ID where you install the extension.
The application doesn’t store any of your Facebook data except the Facebook page ID.
If you want to delete your id from our database, simply contact-us by email.

Good morning
i have installed the module, but my facebook page is like that: http://www.facebook.com/pages/GCOMM/204704196233369?sk=app_290911957094
Can you help me?
Pietro
What is your problem ? Everything seems to work fine on your page.
Dear Sirs
I have installed your application to my facebook page and would like some instructions for ‘managing’ my items.
I would like to know how to change the order of the images that appear.
Also one of the items is not in stock any more but it is still displayed.
These 2 questions are the most important to myself but there are more!!
My facebook page is http://www.facebook.com/pages/Suffolk-Sewing-School/121456977886497?fbhref=product.php%3Fid_product%3D2012838&app_page=1&v=app_290911957094&sk=app_290911957094
a bientot
Ann
Hi Ann,
No support will be made by comment (comments will be deleted)! Please contact-us instead ! We will reply as soon as possible. Add to your request, the URL of your Facebook page and the url of your store.
Hola, he instalado el módulo y la primera pantalla me sale bien. Cuando pincho en cualquier categoría o producto se queda la pantalla en blanco. Cual es el problema???
Retour de ping : » Manuel : Installer Shopializable sur votre boutique Prestashop - Magavenue : Le Blog du ecommerce Open Source (Magento, Prestashop…)
Bonjour,
Je voulais m’assurer si ce module fonctionne sur le nouveau facebook avec le timeline je veux dire.
Merci de votre reponse.
Cordialement,
Sandra
Is it necesary to have ssl to make this module work fine? I don’t have ssl and not planning to have it.
Hi rincon,
No it is not necessary.
Regards
adipex It’s very colorful and lvloey OLED screen is slightly smaller than the touch screen, but the player itself feels quite a bit smaller and lighter. It weighs about 2/3 as much, and is noticeably smaller in width and height, while being just a hair thick